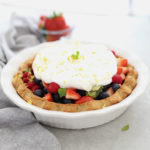
Use this gluten-free pie crust for all your gluten-free quiche and pie needs, both sweet and savory. It is a buttery soft and flaky pie crust that's wonderful and can also be used for quiches and bars.
This elegant recipe is about to be your new favorite go-to gluten-free pie crust recipe that is super simple to make and handy to have around! It is a divine staple crust recipe to use for simple pies, tarts, and healthy quiche or breakfast quiche, and adds a beautiful addition to any table.
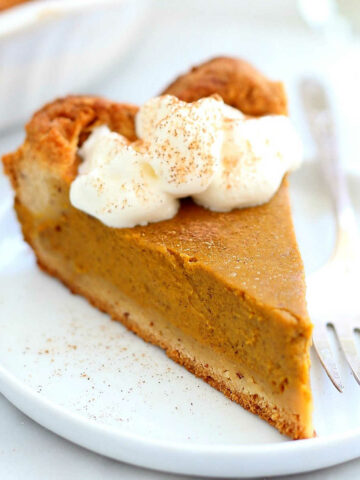
I hope you celebrate every holiday, pumpkin pie, fruit pie, and crumble with this gluten-free pie crust! Be sure to also check out our paleo pie crust recipe as well!
Jump to:
Why this gluten-free pastry crust works
- Gluten-free, buttery, soft, and flaky! One thing about gluten-free pie crusts are you do not want to end up with a rubbery crust that is hard to the touch or is crumbly and dry. There are a few tricks up my sleeve to teach you how to successfully make the best gluten-free pie crust! This recipe has been tested over and over again to assure it turns out soft.
- This crust recipe is dairy-free optional. If dairy is problem, this is a super tasty pie crust that works fantastic using vegan butter.
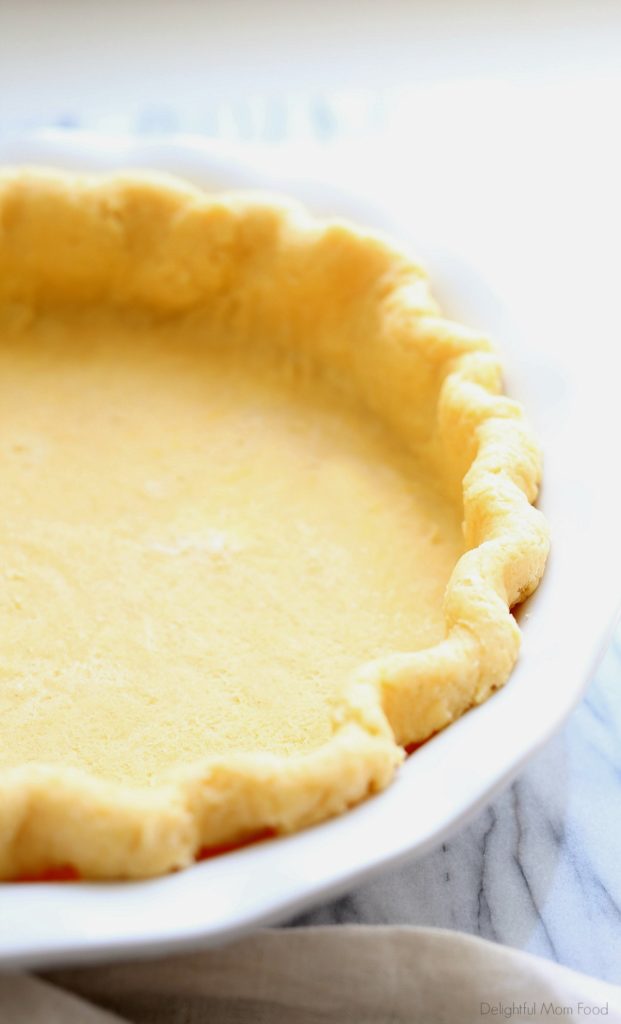
- This makes a lot of crust for thick buttery edges that melt in your mouth with every bite! This pastry makes a 9-inch pie crust with an extra thick edge. Or use any leftover dough to create cut-out designs on the top of a pie. Make two of this recipe if you are making an apple pie or lattice pie. It is really handy to have on-hand a second pie crust to whip together a gluten-free chicken pot pie one night and a spinach quiche recipe on another busy night!
Key ingredients

Here is what you need to get started: egg, apple cider vinegar (this activates gluten-free dough and makes them more fluffy), chilled water, gluten-free flour blend of choice (I suggest Bob's Red Mill Gluten-Free Flour - without dairy, or Cup-4-Cup Gluten-Free Flour - which does contain dairy), sugar, xanthan gum, baking powder, salt and butter. Use vegan butter if you have a dairy-allergy.
Recipe instructions
STEP 1: In a small bowl whisk together the egg, water and vinegar.
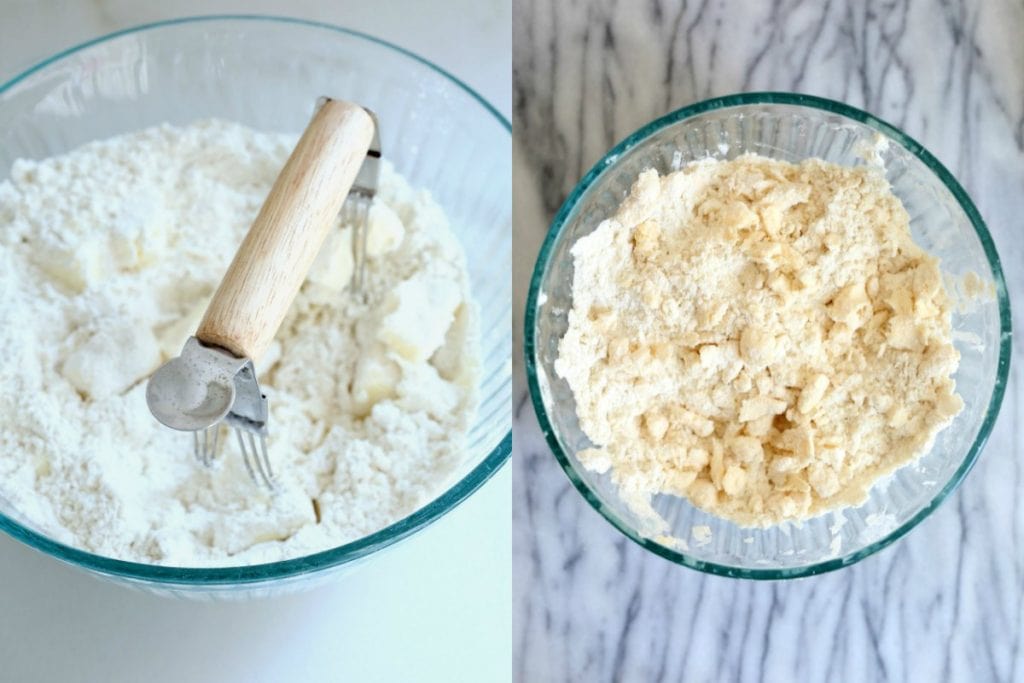
STEP 2: In another bowl combine the gluten-free flour, sugar, xanthan gum, salt, baking powder and mix to combine. Add in the chilled butter cubes.

STEP 3: Using a pastry cutter or two knives, cut the butter into the flour until it forms a fine crumb about the size of a pea.
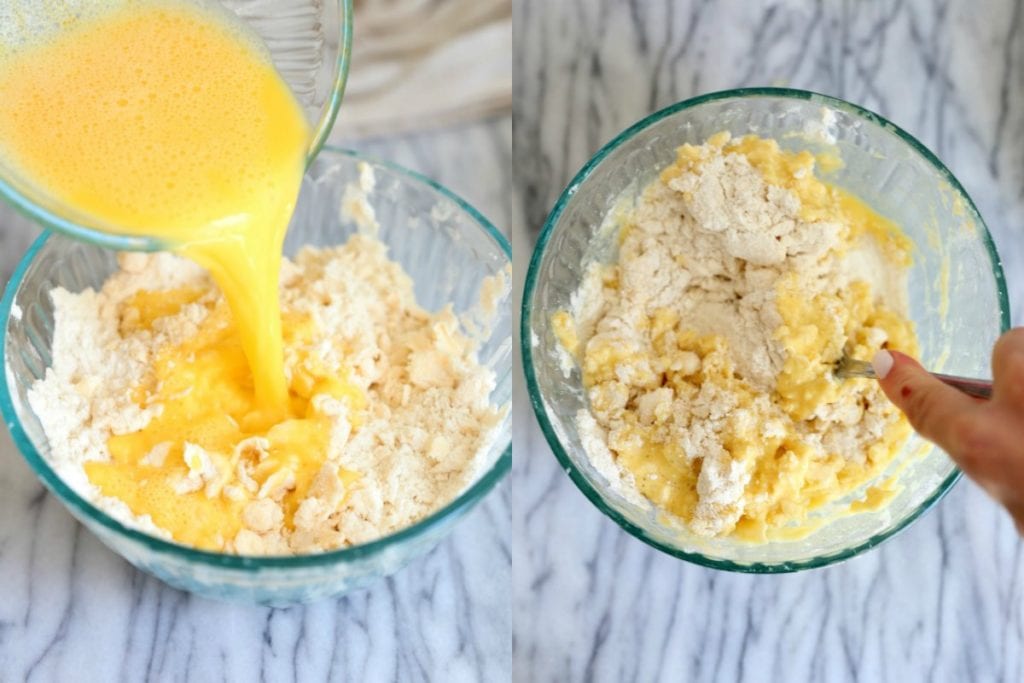
STEP 4: Pour in the egg mixture and using a fork mix together quickly to form a dough. Use your hands quickly if needed, but you do not want to dough to get warm. If the dough seems dry, add 1 tablespoon at a time of chilled water.
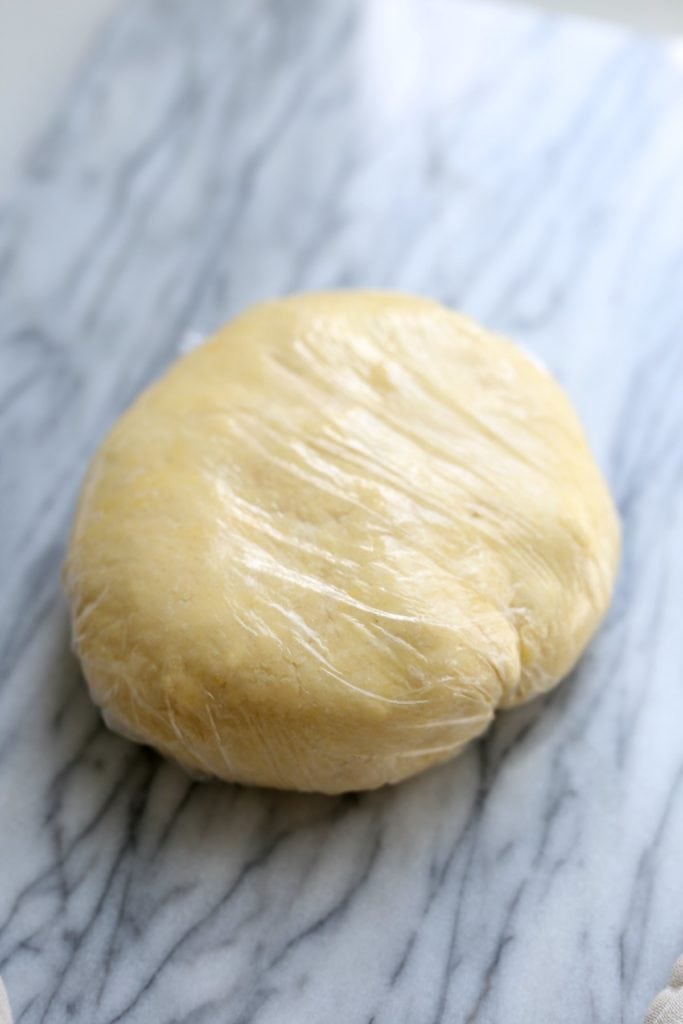
STEP 5: Form the dough into disk and wrap in plastic wrap. Set in the refrigerator for 30 minutes to 1 hour, or overnight before using. This chills the dough and sets the flavors.
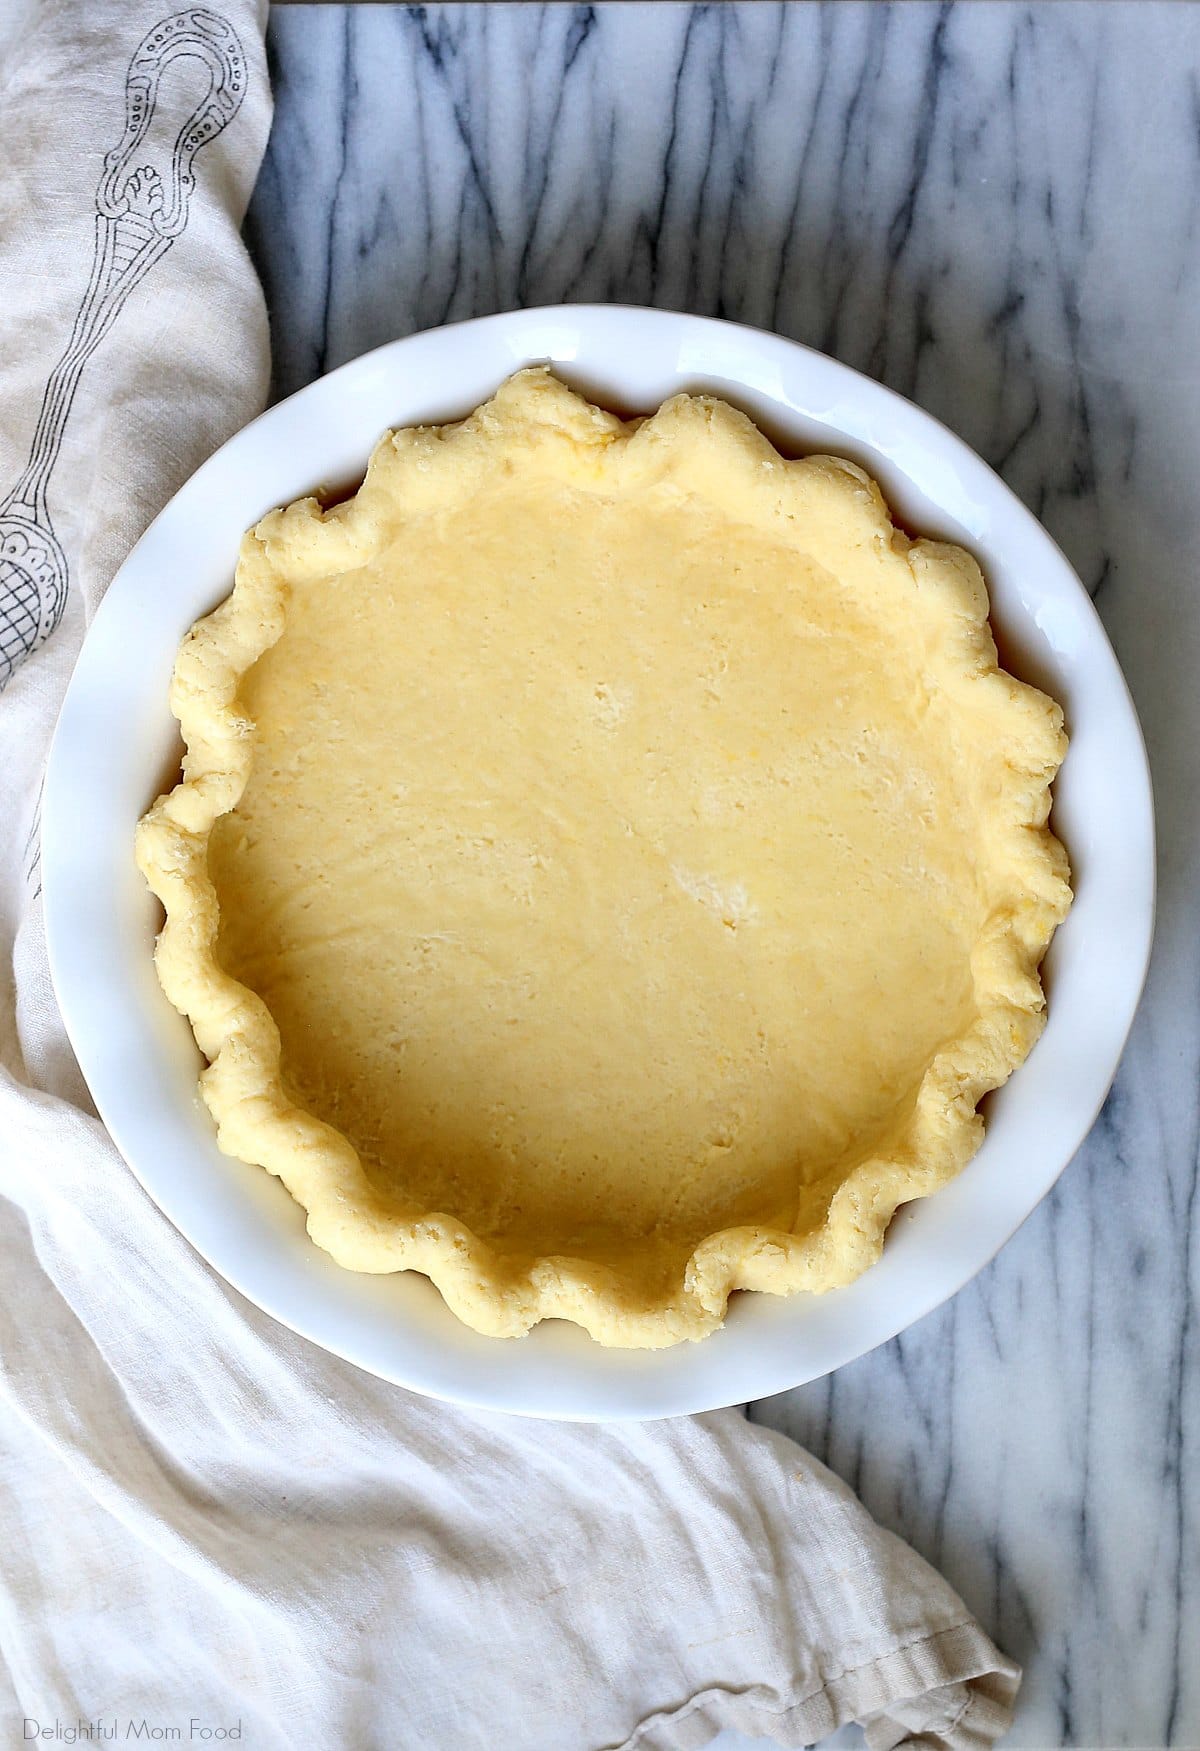
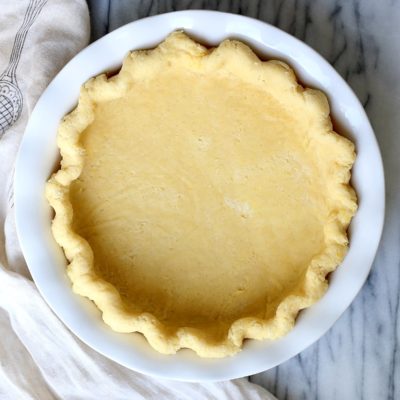
STEP 6: To use the gluten-free pie crust, roll it out on lightly floured parchment paper into a 13-inch round. The circle won't be perfect, that is ok. If you get tears in the dough, patch it up with extra dough from the sides.

STEP 7: Either transfer the dough from the floured surface to the center of a 9-inch pie dish, or leave it on the paper and gently flip it upside-down over the dish. If it is sticky, set the dough in the refrigerator for 15 minutes before separating from the parchment.
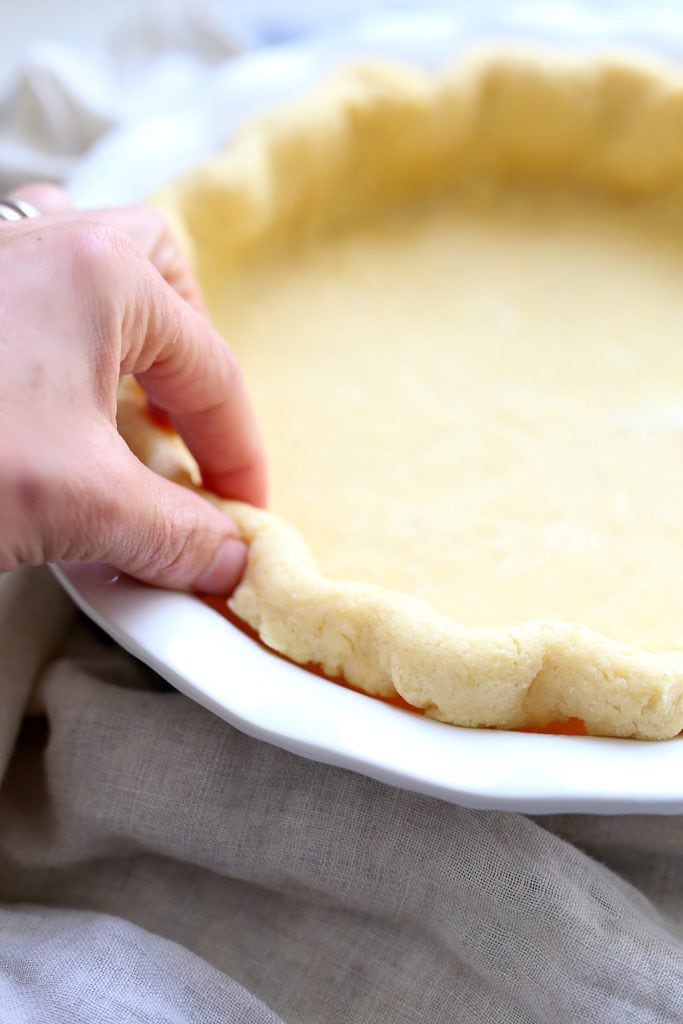
STEP 8: Using your hands, roll the edges under and crimp in 1-inch increments. Use as directed in the individual recipe. If there is extra dough, use it for designs on top of a pie.
Expert tips
Cold crust is key. Keep the butter, water and eggs as cold as possible. Chill the butter in the freezer for 10 minutes prior to cooking if using vegan butter as that tends to be softer. Add the butter direct from the fridge and use water that is chilled with ice if necessary. When the chilled butter and water hit the oven it creates steam which helps make the crust extra flaky. Having a chilled pie crust also helps it not to shrink during baking.
The secret to a fluffier flakier gluten-free pie crust is the addition of egg, baking powder, and apple cider vinegar to help leaven the dough so that it is not hard and rubbery when cooked. If your gluten-free flour mix has baking powder you do not necessarily need it, but I found it makes the dough softer- like melt-in-your-mouth good!
Recipe FAQs
Resting the disk of pastry dough in the refrigerator for 30 minutes to 1 hour allows the ingredients to settle and provides a nice flakey crust. If you see clumps of butter in the dough, that is good, you want that! Those clumps melt into a the soft crust when cooked.
If the pie crust seems dry, add 1 tablespoon at a time of chilled water until the consistency works with the gluten-free flour used.
It is ok to work quickly using your hands to break the butter down if you need but work super fast so the ingredients stay chilled. Some bakers say no, because it melts the butter and makes the dough less flakey when it cooks, but if you work fast this method is great.
That is a result that the pastry dough needs more liquid and water to help it fluff up.
Where to use this recipe
- Tomato Zucchini Pie
- Gluten-Free Chicken Pot Pie
- No-Bake Pumpkin Pie
- Gluten-Free Pumpkin Pie
- Coconut Cream Pie
- Spinach Quiche
- Breakfast Quiche
- Healthy Yogurt Quiche
Be sure to check out these other tasty recipes

I hope you enjoy this Gluten-Free Pie Crust Recipe! Follow along with me on Instagram, Pinterest, Facebook, YouTube and Twitter for a feature and more recipe inspiration! And don't forget to rate the recipe in the recipe area and leave a comment below!
Gluten-Free Pie Crust Recipe
Would you like to save this?
Plus get latest recipes and emails.
Ingredients
- ¼ cup cold water plus 1 tablespoon at a time of the dough is dry
- 1 large egg
- 1 teaspoon apple cider vinegar
- 1 ½ cups gluten-free flour mix
- 2 teaspoons sugar
- ½ teaspoon salt
- ½ teaspoon xanthan gum
- ½ teaspoon baking powder
- ½ cup cold unsalted butter cut into cubes, or use vegan butter
Instructions
- In a small bowl whisk together the egg, water and vinegar.
- In a large bowl combine the gluten-free flour, sugar, xanthan gum, salt, baking powder and mix to combine. Add in the chilled butter cubes.
- Using a pastry cutter or two knives, cut in the dough until it forms a crumb about the size of peas.
- Pour in the egg mixture and using a fork mix together quickly to form a dough. Use your hands quickly if needed, but you do not want to dough to get warm. If the dough seems dry, add 1 tablespoon at a time of chilled water.
- Form the dough into disk and wrap in plastic wrap. Set in the refrigerator for 30 minutes to 1 hour or overnight before using. This chills the dough and sets the flavors.
- To use the gluten-free pie crust, roll it out on lightly floured parchment paper into a 13-inch round. The circle won't be perfect, that is ok. If you get tears in the dough, patch it up with extra dough from the sides.
- Either transfer the dough from the floured surface to the center of a 9-inch pie dish, or leave it on the paper and gently flip it upside-down over the dish. If it is sticky, set the dough in the refrigerator for 15 minutes before separating from the parchment.
- Using your hands, roll the edges under and crimp in 1-inch increments. Use as directed in the individual recipe.


Tim says
I wonder if rice flour works in this recipe ?
Danielle Fahrenkrug, Certified Health & Nutrition Life Coach says
Not by itself. Rice flour would need to be mixed with a starch like arrowroot flour, tapioca flour, and or potato starch to help it stay together.
Jayne says
Thank you for this wonderful recipe! I've made quite a few in the past and they never turn out so yummy! My daughter is GF and she loved it. My husband is very picky and also liked it a lot!
Danielle Fahrenkrug, Certified Health & Nutrition Life Coach says
Hi Jayne, I am so happy to hear. Thank you for sharing! This is my favorite pie crust too- it has soooo many positive Pinterest reviews:).
Jayne Linderman says
Thank you for this wonderful recipe! I've made quite a few in the past and they never turn out so yummy! My daughter is GF and she loved it. My husband is very picky and also liked it a lot!
paula says
I am not gluten free but some of my sisters are. I am having a luncheon for them and would like to make quiche. Normally I freeze my crusts ahead and just pour in my ingredients just before going into my preheated oven. There is nor shrinking and I am able to get everything prepped ahead. Do you think it would work with this crust.
Danielle Fahrenkrug, Certified Health & Nutrition Life Coach says
Yes, that will work for this crust. Let it thaw in the refrigerator and if it seems dry at all just add a splash of water, a little at a time, until it is workable.
Leanne says
I tried this because the egg, vinegar, and baking powder were the key ingredients in my usual pie crust. The results were outstanding. I used cup4cup and I couldn't be happier. Rolling it between parchment sheets worked perfectly. I am ready to bake for the holidays now!
Danielle Fahrenkrug says
Leanne, you just made my day! I love hearing your experience and am so glad you are happy with the results! Thank you so much for your comment and rating:-). Happy holiday baking!
Quiterita Simms says
Hi. If you used cup 4 cup. Does that mean you omitted the xanthum gum? I usually use bobs baking flour. And don’t add the xanthum gum!
Danielle Fahrenkrug, Certified Health & Nutrition Life Coach says
Yes, you can omit the xanthium gum if your flour has it.
Amy says
You mention Bob's Red Mill flour. Could you specify which one, 1-1 or all-purpose?
Danielle Fahrenkrug says
I suggest the 1-1 Bob's Red Mill Gluten-Free Flour.
Precious says
I don’t bake it at all? Do I need to double the recipe for a bottom and top crust?
Danielle Fahrenkrug says
When you are ready to use the crust, bake it according to your recipe directions, or bake at 350 degrees F. for 10 minutes, or until lightly golden. And yes, double to recipe for two crusts to make a top and bottom.
Marie says
I've used this wonderful recipe many times and my family loved all the pies. I'm planning for an event that will require quite a few pies and I would love to know if you've had success doing the dough ahead of time and freezing it?
Danielle Fahrenkrug says
Marie, I am so glad to hear you are loving this pie crust and making it on repeat! I suggest to make it and refrigerate it a couple of days in advance if needed rather than freezing it. It does freeze, but honestly may dry out a little. If you need to freeze it you can try it and if the dough crumbles slightly when rolling out, try adding 1 teaspoon at a time of water and mixing it by hand till it holds then reform a patty, wrap in plastic, refrigerate to harden, then use it. If you can just make it a couple of days in advance and leave it in the refrigerator, then that is best.
Michelle says
Can I use a food processor to at least get combine the butter and flour?
Danielle Fahrenkrug says
I have not tried that, so I can't recommend it to see how it changes the texture as over mixing can make it not flaky. If you do try it, I would suggest having the butter very chilled and pulsing in a few increments.
Julie Hunnel says
I use cup 4 cup gluten free flour. Your recipe calls for xanthan gum. Do I need to add it if my flour blend already has it?
Danielle Fahrenkrug says
If your flour already has it (and to avoid going out to get it for one recipe), you can skip the xanthan gum. It acts as a stabilizer to help hold it together, but it is ok without if using that flour.
Sara says
The recipe ingredients have baking POWDER but the instructions have baking SODA. Could you clarify which one to use, please?
Danielle Fahrenkrug says
Hi Sara, it is baking powder. Thank you for pointing that out:-).
Tami Nowland says
how long do you bake it? and at what temperature?
Danielle Fahrenkrug says
Bake the pie crust according to the directions of the a recipe you are using. Or bake at 350 degrees F for 10 minutes or until golden brown.
Jaime says
Really delicious gluten free pie crust! It turned out perfectly flaky and you’d honestly never know it was gluten free.
Danielle Fahrenkrug says
Thank you Jaime, I am so glad you enjoy this recipe!